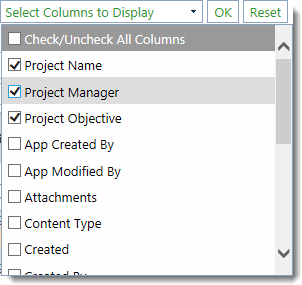
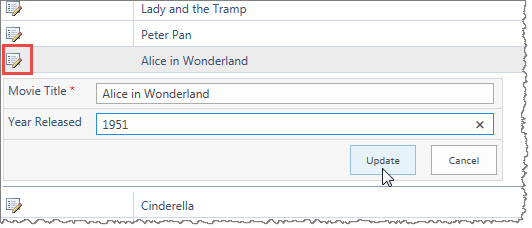
Using Quick Add to Add New Items to a List
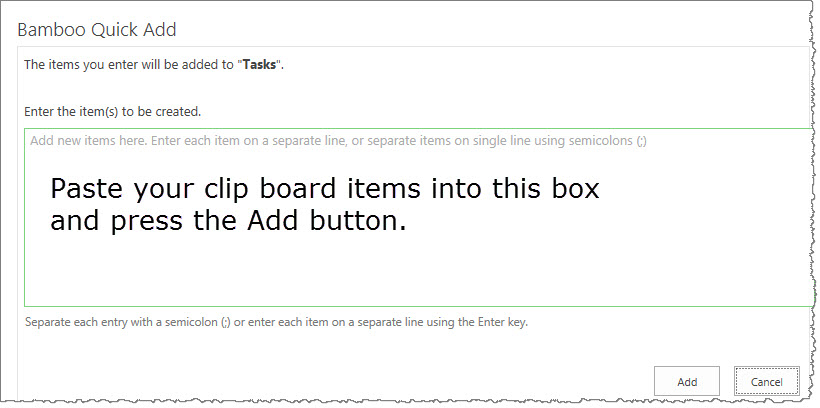 To use the Quick Add Web Part to add new items to a list, simply do the following.
- Locate the Quick Add Web Part on the page.
- Insert the titles of items to be added to the list, separated either by semicolons or entered on separate lines.
- Click Add.
- Confirm the additions by selecting Save.
- Click Done.
New items will be created in the targeted list for each entry, where the primary required field for the list will be populated with the information entered.
You will also be redirected to the target list after the items are created.
Using Pattern Comparison as a Validator
Pattern Comparison allows the Bamboo Validator Column to compare a value entered by a user with either a pre-defined pattern or a custom expression of your own. In addition, you can use and/or logic to require that an entered value matches multiple patterns, or one of several possibilities.

The above image has been edited to better represent the configuration options.
NOTE: The following steps require you to have accessed the New Column settings screen and selected Bamboo Validator as the column type.
|
|
Function |
| 1. |
Select the type of data to be entered into the column from the Column Data Type drop-down menu. The available choices are:
-
Single Line of Text
-
Number
-
Currency
-
Date and Time
NOTE: Additional formatting options may appear in the configuration screen based on your selection.
|
| 2. |
Check the Pattern Comparison check box to expose the pattern comparison configuration options. |
| 3. |
Select Pre-defined pattern to validate user entries against the following options:
-
Phone Number (German & US)
-
Postal/Zip Code (German & US)
-
US Currency
-
Email Address
-
Internet URL
-
Password (6-20 characters, 1 letter and 1 number)
-
IP Address
-
Social Security Number
-
Number
NOTE: The options above are associated with the Single Line of Text column data types. The available choices will differ based on the currently assigned Column Data Type.
OR
To create a custom pattern, select Enter regular expression and define the desired expression in the field to the right.
A detailed explanation regarding how to create an expression can be found in this MSDN article.
NOTE: Regular expression is the only Pattern Comparison available if Date and Time is selected as your column type.
|
| 4. |
Select the Add Another button to add second pattern using the desired logic operator (And/Or). |
| 5. |
Enter a required message in the Validation message field that will be displayed when an entered value is determined to be invalid. |
Using Password Management Toolkit
See individual products within the Password Management Toolkit for how to use them.
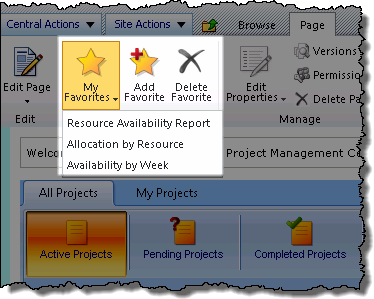
Using PM Central My Favorites
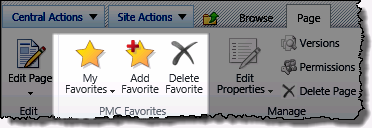
The PM Central My Favorites feature lets you create links to the PM Central pages you most frequently access.
NOTE: This feature is available by default, but may have been disabled by your administrator.
To Add a Favorite
| Step |
Action |
| 1. |
From the page that you want to save as a PMC Favorite access the Page tab in the ribbon and click Add Favorite
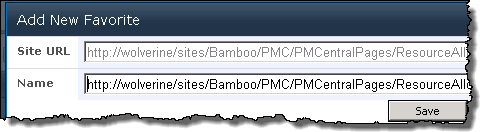 |
| 2. |
Enter a Name for the favorite
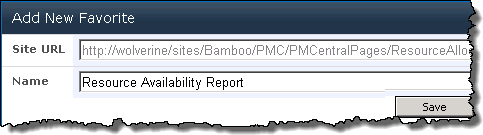 |
| 3. |
Click Save. The new link will be available from the My Favorites drop down selector in the ribbon.
 |
|
Using PM Central Mobile
Once the Server Components have been installed, and PM Central Mobile has been installed and configured, you may begin using the app on your mobile device.
| Step |
Action |
Description |
| 1. |
View Tasks and Issues: |
Simply tap one of the categories on the initial landing page to view the associated list of items. Tap on any item to view the item details. |
| 2. |
My Tasks: |
View all project tasks assigned to you. Tasks are color coded based on whether they are overdue (red), dues this week (yellow), or neither (green). |
| 3. |
My Overdue Tasks: |
View all active project tasks assigned to you that are past their due date.
- My Tasks Due This Week: View all tasks assigned to you that are due this week.
- My Active Issues: View all active project issues assigned to you.
|
| 4. |
Edit Items: |
Tap the edit button on the top right corners of an item view to edit available fields. When finished, tap the save icon on the top right to save your changes. Available fields to update in this release include:
- Task Percent Complete
- Task Status
- Task Last Status Update
- Issue Title
- Issue Due Date
- Issue Status
- Issue Priority
- Issue Category
- Issue Comment
|
| 5. |
Search Items: |
Swipe down on a list of items to see the search fields and search on item and project names. |
| 6. |
Filter Items: |
Swipe down on a list of items to see the filter option. Click on the green funnel filter icon at the top of the page to filter by project. |
| 7. |
Sort Items: |
Swipe down on a list of items to see sort options, or use the green gear settings icon on the top right of the landing page to set a default sort order. |
| 8. |
Refresh Content: |
Simply swipe down on the initial landing page to refresh the list of tasks and issues. |
|
Using Multiple Markers
Often the data that you want to map may fall into several categories and you want the marker for each location to represent the category. This is supported with the Virtual Map View Web Part.
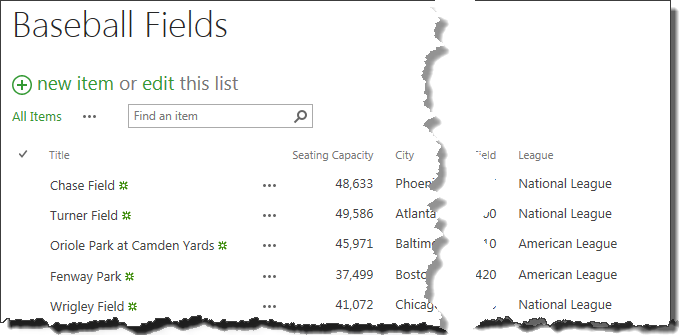 As an example for these instructions, consider a SharePoint list that stores information about baseball fields in the USA.
You want to display National League parks with one marker type ( ) and American League parks with another (
 ).
).
Follow these steps to configure your map with multiple markers:
| Step |
Action |
| 1. |
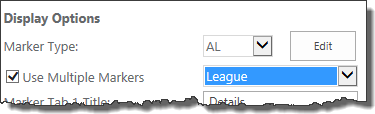 In the tool pane of the Virtual Map View, check the Use Multiple Markers box to use multiple marker types to denote different types of data (i.e., one marker for American League baseball parks and another marker for National League parks). In the tool pane of the Virtual Map View, check the Use Multiple Markers box to use multiple marker types to denote different types of data (i.e., one marker for American League baseball parks and another marker for National League parks).
A selection list will appear next to the Use Multiple Markers box; it contains all the columns from the selected Data Source. Select the column from the data source that stores the value to determine the marker type to use.
In our example using the Baseball Fields list, this column is League.
|
| 2. |
Next, you need to specify which marker to user for each value of the Use Multiple Markers column selected in Step 1 above. If you want to use custom markers, create them first.
NOTE: It doesn’t matter which Marker Type you select when planning to use multiple markers.
 Click the Edit button next to the Marker Type field. An edit window appears. Click the Edit button next to the Marker Type field. An edit window appears.
For each Marker that you want to display on the map, edit the associated tag to update the MarkerType value. MarkerType should equal the value of the Use Multiple Markers column that is associated with that marker.
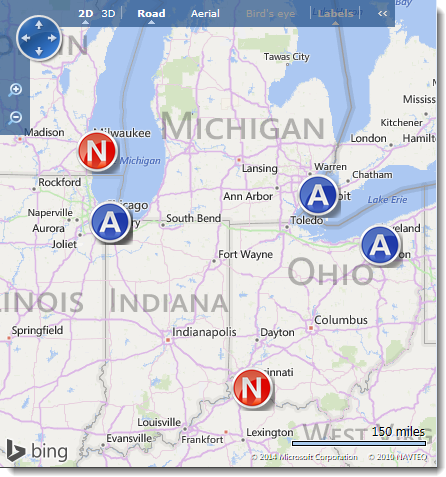
In our Baseball Fields example, the Use Multiple Markers column is League. The League column is set to either American League or National League for each baseball park in the list. For this baseball field example, we created two custom markers, one called NL for National League and the other called AL, for American League. After updating the MarkerType value for each, the tags for those two markers look like this:
 <AL IconName = "Amarker.png" IconWidth = "45" IconHeight = "45" MarkerType = "American League" />
 <NL IconName = "Nmarker.png" IconWidth = "45" IconHeight = "45" MarkerType = "National League" />
When edits are complete, click Save to save changes and close the edit window. Otherwise, click Cancel to close the window without saving any changes.
|
| 3. |
After clicking Apply and then OK in the tool pane, a portion of the configured map will look like this:
 |
Using Marker Tabs
 The Marker Tabs appear when a marker on the map is clicked. An example with two tabs (General and Stats) configured is shown here.
NOTE: The Bing MapTM display shows the pages of the popup slightly different than the Google MapTM display. The one shown here is the Bing MapTM display.
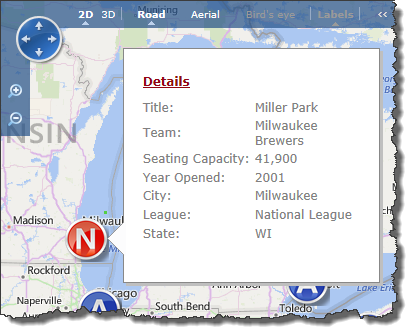
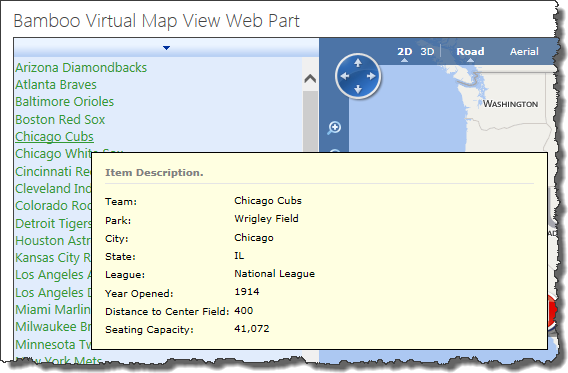 Another pop-up display, called Item Description, appears when the end user hovers over the list of items on the left side of the Virtual Map View display. An example is shown here.
To configure both displays, follow these steps:
| Step |
Action |
| 1. |
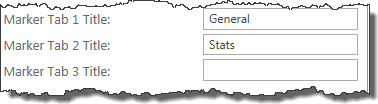 In the Virtual Map View tool pane, decide how many tabs you want to use. Enter a Title for each. In the Virtual Map View tool pane, decide how many tabs you want to use. Enter a Title for each.
NOTE: If you don’t want to use a tab, leave the Title blank.
In the example shown here, we use two tabs and label them General and Stats.
|
| 2. |
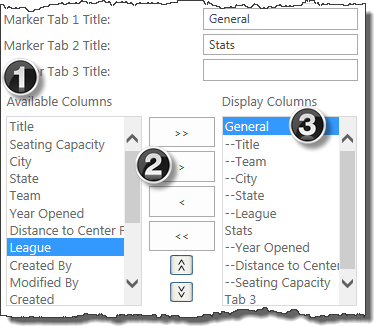 Next, decide what column values from the list to display on each tab. Next, decide what column values from the list to display on each tab.
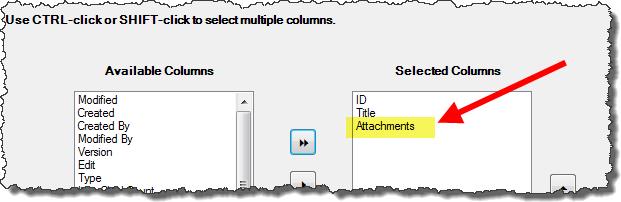
- Select a column from the Available Columns list that you want on the first tab. All columns from the list should be displayed.
- Click on the arrow > button to move the column from the Available Columns list (left box) into the Display Columns list (right box) and it will be positioned under the first tab.
- For subsequent tabs, highlight a tab label in the Display Columns list on the right side before selecting an available column and moving it to the right. It will be positioned beneath the highlighted tab.
To remove a column from the Display Columns list, select the column from the list, and click the left arrow button. The column you highlighted will be removed from that list.
To move the columns up or down once they appear in the Display Columns list, highlight the column in the Display Columns list and click the up ( ) or down ( ) or down ( ) arrow. The highlighted column will move one position. ) arrow. The highlighted column will move one position.
NOTE: You cannot move a column from one tab to another; you can only shift positions of columns within the tab group. To move a column to another tab, remove it from a tab group and follow the procedure above to move it into the appropriate tab group.
|
| 3. |
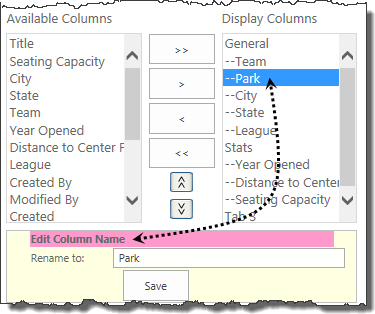 Rename a displayed column. Sometimes the actual column name may be too long or not descriptive. Rather than displaying the actual name of the column, it is possible to use a column alias for display in the marker tab on the map. Rename a displayed column. Sometimes the actual column name may be too long or not descriptive. Rather than displaying the actual name of the column, it is possible to use a column alias for display in the marker tab on the map.
To create an alias, double-click on the column name in the Display Columns list. An Edit Column Name section appears below the web part highlighted in bright pink. Type the new name in the Rename to field. click Save to save your change. After saving the column name, you will see it change in the Display Columns window.
NOTE: The column is not renamed in the source list. This change is only an alias used on the map display.
|
| 4. |
The order of the tabs and columns configured for the Marker Tabs in Step 3 impacts the order that columns appear in the Item Description pop-up shown here. The tab Titles don’t appear here, but the columns do.
NOTE: If the column appears in the Marker Tab, it also appears in the Item Description pop-up. If you created a column alias, it will appear in both pop-ups.
|
Using Lookups in Workflow Studio
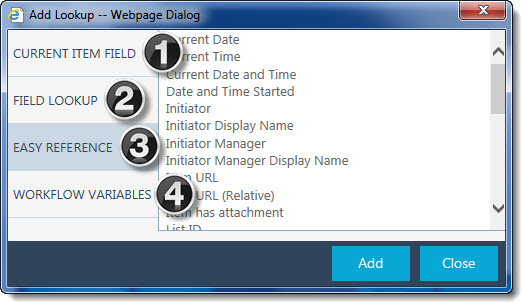 When you configure a Workflow Conductor widget, most widget properties can be defined either by typing or choosing a specific value, or by using a lookup. A lookup is a placeholder for a value that is not known until the workflow runs.
Lookups can be used in many widget properties instead of defining a specific value. When a widget uses a lookup, it retrieves the value stored in that location when the workflow runs (more specifically, when that widget runs). This allows a workflow to use a current value for an item so it can behave dynamically based on real-time data. Using a lookup in place of an actual value makes your workflow more flexible and reusable.
You can insert a lookup anywhere you see the lookup icon ( ) or the Add Lookup (
 ) button. When you click the icon or button, the Add Lookup form is displayed. The Add Lookup form allows you to select from various lookups, references, and variables available in the workflow, item, list, site, and even other lists and sites in this site collection or other site collections.
Click on a topic below which describes each type of lookup and gives examples of how to use them.
- Current Item Field
- Field Lookup (formerly “External Lookup”)
- Easy Reference
- Workflow Variables
Using List Search Simple Web Part to Search a Discussion Board List
Using List Search Simple Web Part to Search a Discussion Board List
After successfully configuring List Search Simple Web Part, you are now ready to begin searching your Discussion Board Plus list. To search the posts in a Discussion Board Plus list, enter search words or phrases or select options in the List Search Simple Web Part and click the Search button. If Print and Export to Excel options are enabled for the List Search Simple Web Part, these options are displayed below the search criteria.
The following information describes how to use individual Discussion Board Plus search fields to obtain effective search results. For general search tips, including tips for combining search terms and using search operators, see How to Use the List Search Simple Web Part.
| Search Field |
Search Tips |
| Subject |
Searches the Subject field of discussion topics. A single result is returned for each matching topic; results are not repeated for individual replies in the thread. For search term tips, see Using the List Search Simple Web Part. |
| Body |
Searches the Body field of all discussion posts. Results are returned for all posts that contain matches. For search term tips, see Using the List Search Simple Web Part. |
| Created By |
Searches the Created By field of all discussion posts to identify topics and replies posted by a specific user. Enter a name and click the Check User button or use the Browse feature to search for a user.
Note: You can only search for one Created By user. |
| Rating Column |
Available if a Bamboo Rating column was added to the Discussion Board Plus list and the column was added to the Search Columns in the List Search Simple Web Part Settings. Can match topics or replies with ratings Equal To, Less Than, Greater Than, or Between the specified rating. |
| Is Sticky |
When Yes, matches posts that are marked as Sticky. When No, matches posts that are not Sticky. |
| Mark as Answer |
When Yes, matches posts that are Verified Answers. When No, matches posts that are not Verified Answers. |
| Suggest as Answer |
When Yes, matches posts that are marked as Suggested Answers. When No, matches posts that are not Suggested Answers. |
| Search in all columns for: |
Available search option if the SharePoint Search service is configured and the option to Allow search in all columns is checked in the List Search Simple Web Part Settings. Search terms entered in the Search in all columns for field will be matched in any Discussion Board List column. Entering search terms here overrides any search criteria entered in other fields. For search term tips, see Using the List Search Simple Web Part.
Note: For an item to be found using a Search in all columns for search, you must also be able to find it in SharePoint Search.
|
After you click Search, search results are displayed using a view optimized for Discussion Board Plus.
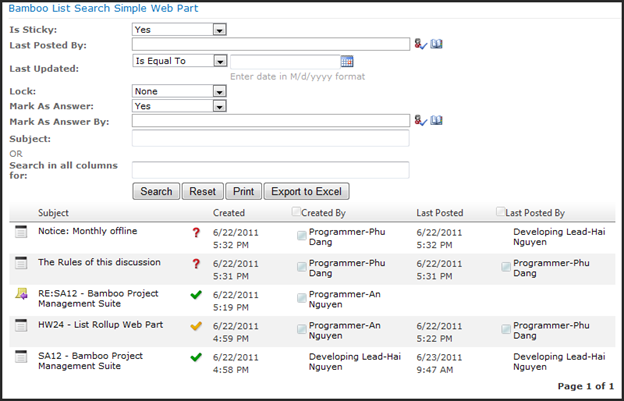
The following columns are included in the search results:
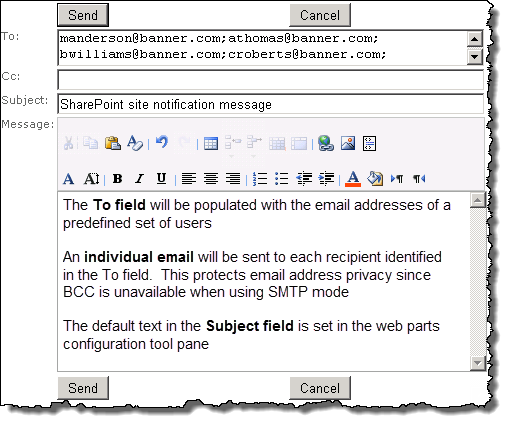
Use Group Email to send messages
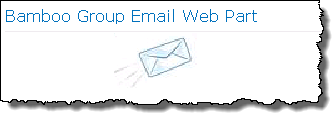 When Group Email is added to a web part page, users will see the Group Email icon.
Users with permission to send emails will be able to quickly send messages to a pre-determined group of users by simply clicking the email icon on the page.
NOTE: Users who are not members of groups allowed to send emails will see the icon on the page, but it will not respond when clicked.
When clicked the icon will respond in one of two ways, based on the web parts configuration:
Option 1: Group Email is configured to use SMTP
| Step |
Action |
Result |
| 1. |
Click the mail icon on the page. |
The SharePoint page will refresh and display a mail form
 |
| 2. |
Enter the desired text and click Send. |
You will see a confirmation message that the email was successfully sent.
NOTE: Individual emails will be sent to each user to preserve email address privacy.
|
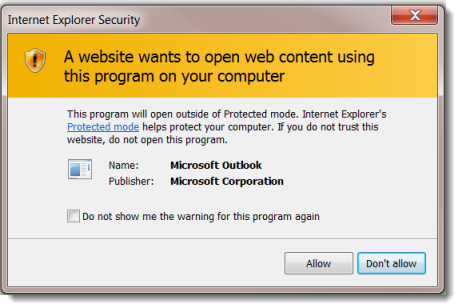
Option 2: Group Email is configured to use your mail client
| Step |
Action |
Result |
| 1. |
Click the mail icon on the page. |
A popup will appear on the screen.
 . . |
| 2. |
Click Allow |
Your mail form will open. The bcc field will be populated with a predefined subset of users.
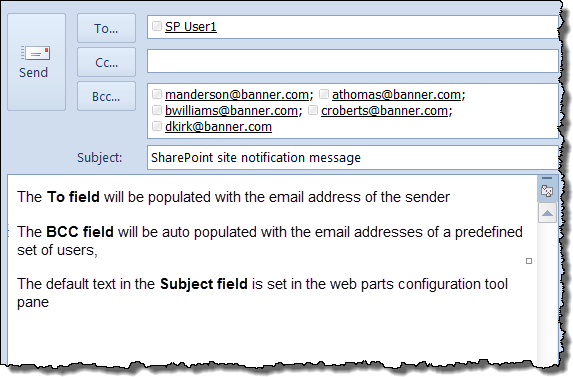
NOTE: If you choose to use Mail Client to send out email, the default mail client editor is displayed. The current user email address appears in the “To” field and all other users email addresses appear in the “Bcc” field of the email. If you choose to use Mail Client to send out email, the default mail client editor is displayed. The current user email address appears in the “To” field and all other users email addresses appear in the “Bcc” field of the email.
|
| 3.. |
Enter the desired text and click Send |
Your mail client will be responsible for delivery of the email.
NOTE: You can only edit email content in text mode and not HTML format. There is a total of 2043 character limit including email addresses and the body text.
|
Use File Share Library with Video Library
Interacting with Media Files
When you upload a media file or add a media file link in Video Library that is connected to a File Share Library, you may notice that the upload page uses the standard SharePoint Document Library upload page, not the customized Video Library page. The functionality is the same; you can still upload files and add links just as you can with a standalone Video Library.
About the Status Column
 When the contents of Video Library are stored in File Share Library, a Status column is added to the Video Library Standard view. This column shows the status of the file in the File Share Library.
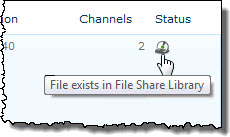
About the Status Icons
| Icon |
Status Value |
Description |
 |
File exists in File Share Library |
The file or folder was verified to be in the File Share Library the last time Video Library synchronized with it. You should be able to access the item. |
 |
File not available |
The file or folder is not available in the File Share Library and cannot be accessed in Video Library. This could be for several reasons:
- The item was deleted, and the File Share Library settings for deleting items say to leave the link in the library but mark the item as not available. Video Library inherits File Share Library settings.
- If all items display this status, the File Share Library connection may not be working, or the network file share may be offline.
- If the status changes to File not available when attempting to access an item, the item may have been deleted since the last synchronization (the status was not updated yet).
|
|
Interacting with multimedia files in a Video Library that is connected to a
File Share Library is no different than a standalone Video Library. You can still play files, edit properties, and upload or delete files directly from Video Library. As a user, it does not matter where Video Library stores its files.
Media File Metadata
Media file metadata is stored with the link to the file in Video Library, not with the source file in the File Share Library. Edit metadata properties for multimedia files in Video Library. Available metadata properties are still populated automatically when you upload a media file.
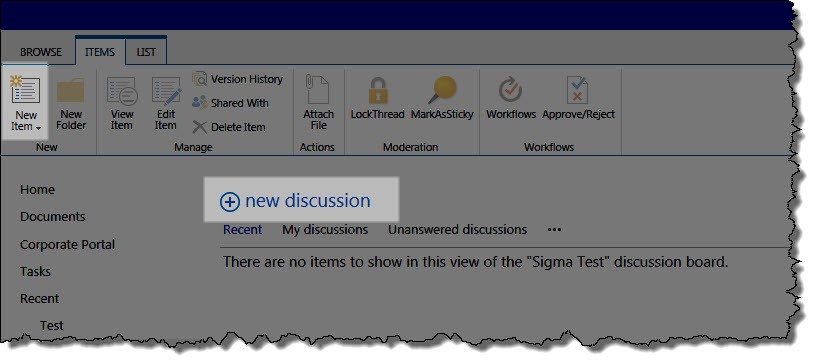
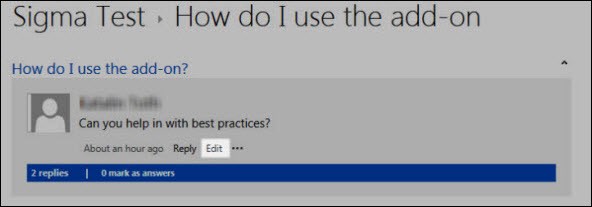
Using Discussion Board Plus
After you create a new Discussion Board Plus
application, you can start adding and replying to posts just like you would in an out-of-the-box SharePoint Discussion Board.
|
SharePoint 2013:
|
| Step |
Action |
Result |
| 1. |
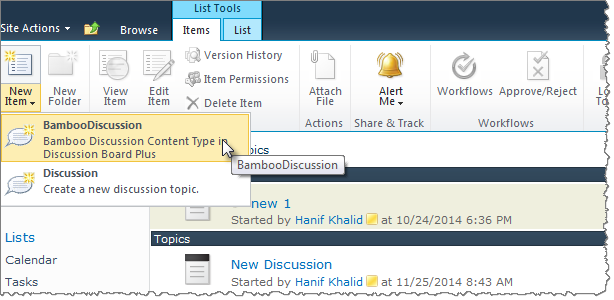
To add a new post, click the + new discussion link or click New Item in the Items ribbon. By clicking the drop-down arrow, you can select to create a BambooDiscussion, a BambooMessage, or a Discussion. |
 |
| 2. |
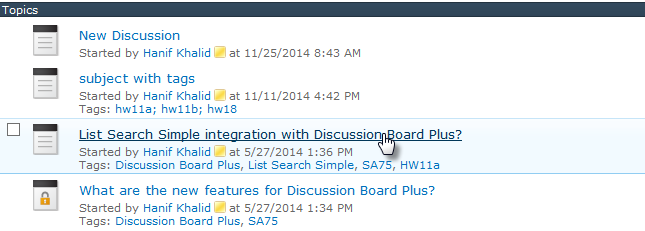
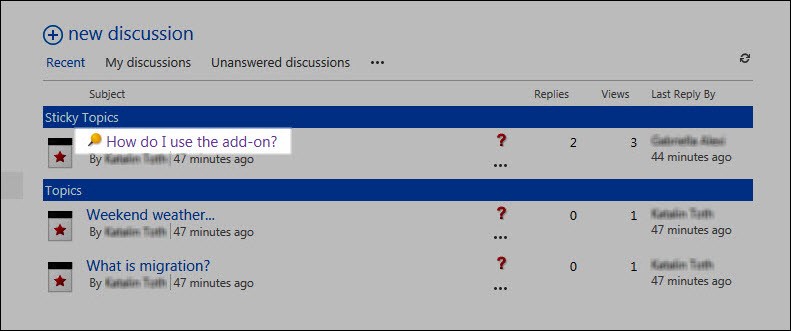
To view all the posts in a topic (thread), click the Topic name. |
 |
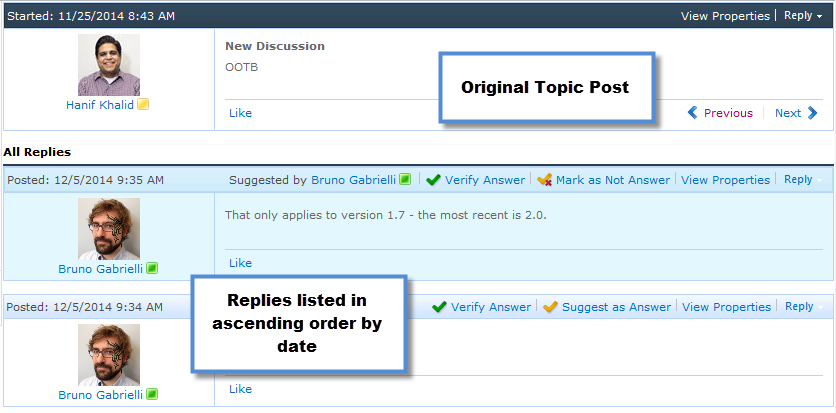
| 3. |
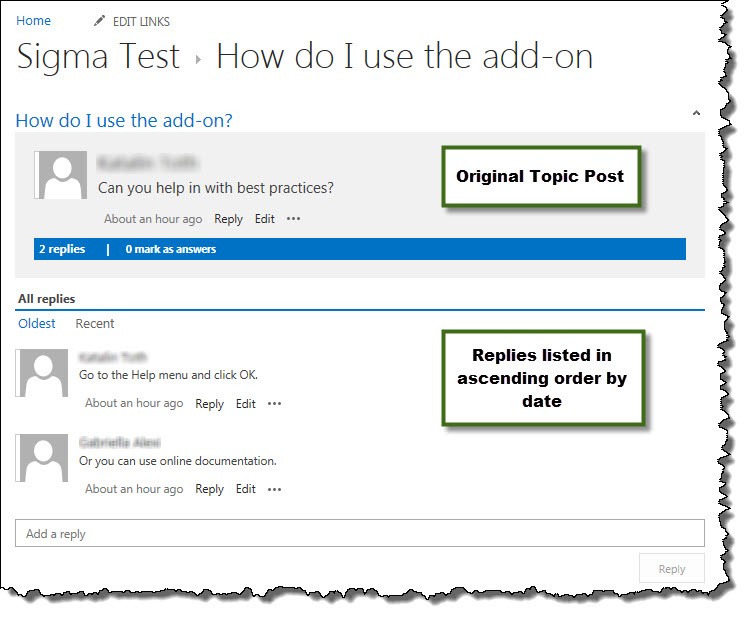
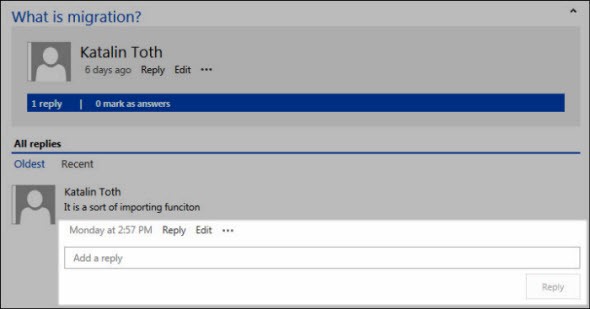
To reply to a post, click the Reply in the ribbon under the topic owner’s name or click in the Add a reply field and start writing your reply. Click Reply and your reply is sent and appears in the thread. |
 |
| 4. |
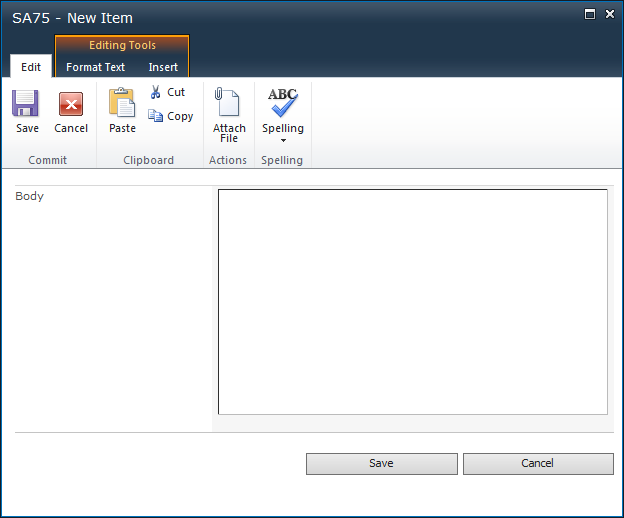
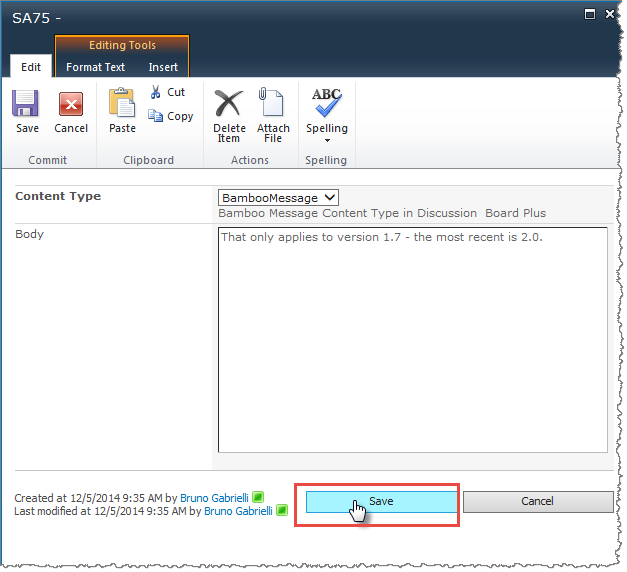
To edit an existing post that you posted, click the topic name and click Edit in the ribbon under your name and start writing. |
 |
| 5. |
After editing your post click Save to save your changes or Cancel to return to the post unchanged. |
NOTE: Anonymous users can view Discussion Board Plus posts, but cannot add new posts or reply to existing ones.
|
|
See also:
Configure Rating Column to use True/False scale
 When the Rating Column is configured to use the True/False rating scale, the following rating statistics will be displayed:
The following steps require you to have accessed the New Column settings screen, and selected Bamboo Rating as the column type.
The above image has been edited to better represent the configuration options. |
|
|
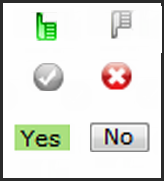
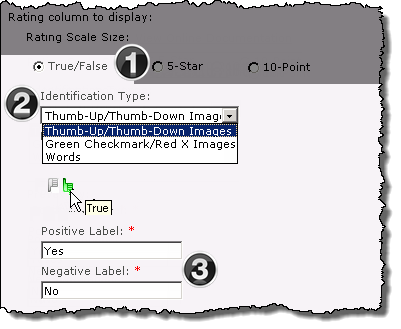
1. Click the True/False radio button.
|
|
2. Select an Identification Type from the drop down menu.
|
|
3. Enter the text to be displayed when users mouse over each icon in the Positive and Negative labeled fields.
NOTE: If the Words Identification Type is selected, these values will appear on the buttons.
Example : Yes and No
|
|
Configure Ratings column to use the 5-Star rating scale
 When 5-Star is selected as the scale for the Rating Column the ratings statistics available to users will be determined by your selection of :
The following steps require you to have accessed the New Column settings screen and selected Bamboo Rating as the column type.
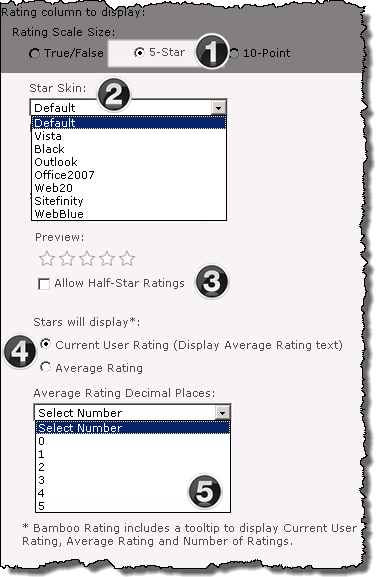 The above image has been edited to better represent the configuration options The above image has been edited to better represent the configuration options |
|
|
1. Click the 5-Star radio button under Rating Scale Size
|
|
2. Select the Star Skin from the drop down menu. The selected color schema will be visible in the preview section
|
|
3. By default, users rate content using whole stars. To change this setting click Allow Half-Star Ratings
|
|
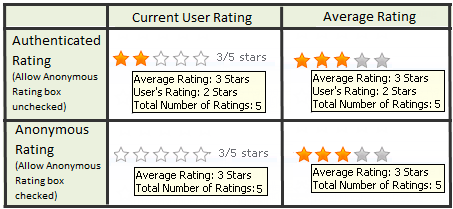
4. The selections under Stars will display determine what stars represent to users:
Current User Rating:
-
Displays shaded stars representing the authenticated users rating.
-
If the user has not rated the content, or if Allow Anonymous Rating is selected, the rating stars will display without shading.
-
The Current Rating Average will be displayed next to the stars as text
Average Rating:
Users will see their current rating, the average rating, and the total number of ratings submitted as tooltip text when they mouse over the icons.
|
|
5. If Current User Rating was selected as the Star display mode, use the drop down selector to define how many decimal places between 0 -5 will be displayed.
NOTE: The selector will be hidden if Average Rating was selected as the Star display mode.
|
|
 With Bamboo’s User Registration Accelerator you save time registering, approving and creating SharePoint accounts by letting users self-register. Users can register for SharePoint access and, once validated, can have both their domain and SharePoint accounts created automatically.
Install
|
Permissions
|
License
|
Permissions
|
|
|
 |
|
|
Configure
|
Permissions
|
Work With
|
Permissions
|
|
|
 to configure this Bamboo product.") |
|
 |
Click here if you would rather see a complete list
of all topics for this product. |
 Click on the shopping bag or here to download a trial of the product or to purchase it. Click on the shopping bag or here to download a trial of the product or to purchase it. |
User Redirect
 Use Bamboo’s User Redirect to protect sensitive data by redirecting specific users from restricted site pages quickly and easily.
Install
|
Permissions
|
License
|
Permissions
|
|
|
|
|
|
Configure
|
Permissions
|
Work With
|
Permissions
|
|
|
|
- End Users do not interact with
this web part. When a specified
user attempts to access the page where
User Redirect resides, s/he will be allowed
to see the page or redirected, according
to the configuration settings of the web part on the page.
|
|
Click here if you would rather see a complete list
of all topics for this product. |
Click on the shopping bag or here to download a trial of the product or to purchase it. |
|
Using the User Profiles Import utility to populate the Enterprise Resource Pool
With User Profile Import in PM Central, you can map and import users and their profiles, in bulk from the SharePoint User Profile Database to the Enterprise Resource Pool (ERP).
When using User Profiles Import keep in mind:
-
You must configure a Search Service application on the SharePoint server for the User Profiles Import utility to successfully search existing user profiles on SharePoint Server 2010. If the User Profiles Import Utility is unable to find users, verify that you are able to find the same users in a Search Center site before contacting Bamboo Support.
-
Information will be copied from the SharePoint User Profile Database
For more information, including links to instructions on how to configure a Search service application, see this article
| Step |
Action |
| 1. |
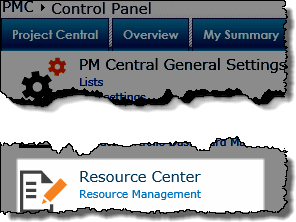
From the PM Central Control Panel on the Portfolio site, click Resource Management to access the Resource Center.
 |
| 2. |
Click User Profiles Import tab to access the tool |
| 3. |
Enter the desired criteria in some or all of the Search fields, then click Search
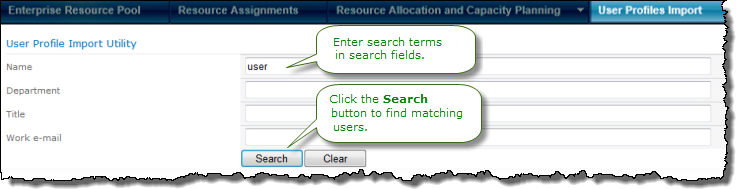
Note: The fields displayed can be modified in the Configuration Web Part Settings.
|
| 4. |
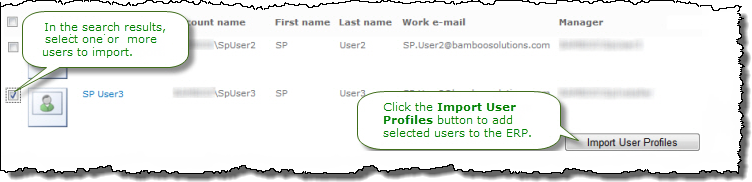
From the search results, select the users you want to import into the Enterprise Resource Pool, or click the top checkbox to Select All
 |
| 5. |
Click Import User Profiles.
User information will be imported into the ERP using the defined field mappings. |
|
User Profile Synchronization
 To sync Active Directory changes to the MOSS user profile database, select the Push changes in AD to MOSS User Profile check box, and then enter SharePoint account information that has the “Manage User Profile” permission in order to read and update user profile information.
For detailed insight into Active Directory Domain Services, see this TechNet article from Microsoft.
User Manager for Sites: Sites View Pane
| Step |
Action |
Result |
| 1. |
Site icons |
The red site icon  in the tree indicates that the site inherits user permissions from the parent site. The blue site icon in the tree indicates that the site inherits user permissions from the parent site. The blue site icon  indicates that the site has unique permissions. indicates that the site has unique permissions. |
| 2. |
Site Information |
Click on a site node (including the top level site) to see tabbed information in the right pane containing Group, Permission and User information for the selected site. You can drag and drop column headings in each of these tabs to the bar directly above the information grid to group information by that column heading. |
| 3. |
Export site information |
You can export the list of Groups, Permissions, or Users in the right pane to Microsoft Word or Excel by clicking one of the buttons at the bottom right of the information grid. |
| 4. |
Create groups and users |
The Sites view pane is the only view where you can create groups and users. |
| 5. |
Right-clicking Sites, Groups or the Groups node |
Right-click a site, group or the Groups node to view a context menu of available actions.
- Right-clicking any site name allows you to create a user or a group for that site.
- Right-clicking the Groups node under any site allows you to create a new group for that site.
- Right-clicking a group name allows you to delete the group, add users to the selected group, or e-mail all the users in the selected group.
|
|
These topics provide more detailed information about user and group actions within the web part:
User Manager for Sites: Manage Groups
Selecting a group under the Groups node of a site shows group profile information and a list of members of the selected group in the right pane. Right-clicking the group allows you to delete the group, e-mail all the users in the selected group, or add users to the group. You can also delete or e-mail the selected group by clicking the Actions button and selecting the appropriate menu option, or add users to the selected group by clicking the New button.
Add Users to Selected Group
Type in the users names separated by a semi-colon, use the Check Names icon to verify the user names, or click the Address Book icon to search for users.
E-mail all users in the selected group
Just type the Subject line and body message and click Send to send an e-mail to all the users in the selected group directly from the Web Part.

Delete the selected group
Select this option to delete the selected group.
Group Users
Selecting a user under a group node shows their profile and group membership in the right pane. On the Profile tab, click the Edit button to edit user profile information or click Sort to sort the user properties in ascending or descending alphabetical order. On the Groups tab, select a group(s) and click Remove from Group to remove the selected user from the selected group(s). From the tree, right-clicking the user allows you to remove the user from the group or e-mail the user.
- E-mail the selected user. Select this option to send an e-mail directly from the User Manager for Sites to the selected user. Same as e-mailing a user from the Alphabetical view pane.
- Remove the user from the group. Select this option to remove the user; it does not delete the user from the site or the Site Collection.
See also:
 Bamboo’s User Profile Sync lets you automatically synchronize user information between the SharePoint User Profile database, Active Directory, Contact Lists and WSS 3.0 User Information Lists.
Install
|
Permissions
|
License
|
Permissions
|
|
|
|
|
|
Configure
|
Permissions
|
Work With
|
Permissions
|
|
|
|
End Users do not interact with this web part. |
|
Click here if you would rather see a complete list
of all topics for this product. |
Click on the shopping bag or here to download a trial of the product or to purchase it. |
 With the User Profile Plus web part, you can display user profile data alphabetically, by department or by organizational hierarchy from a SharePoint Contacts List or the User Information List. You can grant users the ability to edit their own profiles, print their user profile information, and allow user groups to edit profiles for users belonging to their own department. User profile data can be edited, hidden from all users or made private so that users only see their own private data.
Install
|
Permissions
|
License
|
Permissions
|
|
|
|
|
|
Configure
|
Permissions
|
Work With
|
Permissions
|
|
|
|
|
|
Click here if you would rather see a complete list
of all topics for this product. |
Click on the shopping bag or here to download a trial of the product or to purchase it. |
User Manager for Sites: Create Group
You can also create groups from the New button on the tool bar depending on what node you have selected in the Sites view pane. Creating a group is very similar to creating a group in SharePoint Out-of-the-Box.
| Step |
Action |
Result |
| 1. |
Name and Description |
|
| 2. |
Owner |
Use the phonebook icon ( ) to look up the person who is the owner of this group. (It does not have to be you, but it needs to be a user with elevated permission.) ) to look up the person who is the owner of this group. (It does not have to be you, but it needs to be a user with elevated permission.) |
| 3. |
Group Settings |
Specify who can view and edit the membership of this group. |
| 4. |
Membership Requests |
Select the settings that you want for requests to join or leave the group. You can specify the email address to which requests should be sent. |
| 5. |
Give Group Permission in this Site |
Choose a permission level for this group. |
|
See also:
User Manager for Sites: Alphabetical View Pane
Select a user name in the Alphabetical View in the left pane to view their profile and their group membership displays in the right pane.
| Step |
Action |
Result |
| 1. |
Edit |
Click the Edit button in the right pane to edit user properties. |
| 2. |
Sort |
Click the Sort button to sort the properties A to Z (ascending). Click the Sort button again to sort Z to A (descending). |
| 3. |
Actions |
From the Actions button on the tool bar, you can delete the selected user from the entire site collection, reset the user’s password, or email the user directly. |
| 4. |
Groups Tab |
From the Groups tab in the right pane, you can view the user’s group membership and remove the user from one or more groups. |
| 5. |
Delete, Reset User Password or E-mail the User |
Right-click the user name in the tree to delete the user from the entire Site Collection, reset the user’s password, or e-mail the user.
Reset User Password
Select this option to reset the selected user’s password.
Email the user
Just type the Subject line and body message and click Send to send an e-mail to all the users in the selected group directly from the Web Part.
|
| 7. |
Delete the user from the Site Collection |
Select this option to delete the user from all sites and groups within the Site Collection.
NOTE: This action does not delete the user from the SharePoint User Profile database in order to retain the user’s history throughout SharePoint.
|
|
See also:
User Interaction Widgets
This is a high level overview of the types of User Interaction Widgets available. Click on the name of the widget to get details and examples.
Return to About Workflow Conductor Widgets
See also an Alphabetical List of Workflow Conductor Widgets.
User Directory Display Options
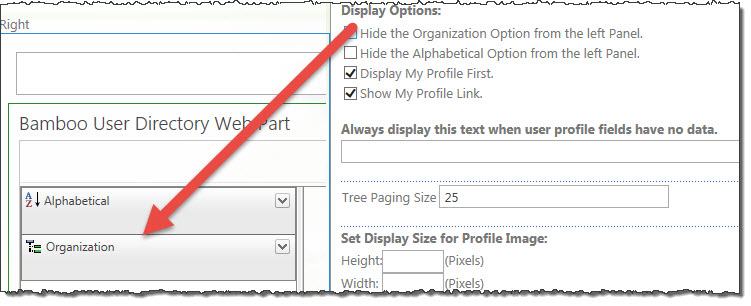 What a user sees on the web part is dependent on how you configure the web part. The display options will allow your end users to see the organization or alphabetical buttons; you do have the choice to hide them by clicking on the checkbox. Below is a table containing the list of columns that appear in this section of the tool pane configuration that lets you control what users see or do not see based on your configuration choices here.
| Column |
Description |
| Hide the Organization Option from the left Panel. |
To hide the Organization option from the tree pane, select or de-select the respective check box. |
| Hide the Alphabetical Option from the left Panel. |
To hide the Alphabetical option from the tree pane, select or de-select the respective check box. |
| Hide Disabled Active Directory User Objects. |
For Active Directory mode, the check box is available to hide or show Disabled Active Directory user objects. |
| Display My Profile First. |
This is the default but if you choose to unclick the box, then the users will see their own profile either alphabetized or in the organizational hierarchy as selected above. |
| Show My Profile Link. |
You can opt to hide or show the link to the user’s My Profile page. |
| Always display this text when user profile fields have no data. |
To display static text in any field in the user’s profile that does not have data, enter your preferred verbiage in the text box provided. If you do not want to display any text, then simply leave this text box blank. |
| Tree Paging Size |
To set the number of items that display in the tree pane, enter a number in the Tree Paging Size text box. If you do not enter a number, then the web part will show all users. If you have hundreds of users, this may take some time to show in the web part. Entering a number below 50 keeps the response time reasonable as well as the |
| Set Display Size for Profile Image: |
Enter in the height and width in pixels to display profile images when available. |
User Directory Configuration
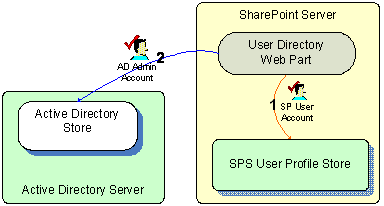 User Directory provides an easy to use, SharePoint-based, self-service directory that allows users to maintain user information in the SharePoint user profile database or Active Directory.
User Directory reads and updates user profile data from SharePoint Portal Server’s User Profile database or an Active Directory database. The diagram here depicts how each of these components fits together as part of the solution.
To configure User Directory, edit the web part from the menu accessed at the upper right corner of the Web Part. This menu is only accessible by users with authority to modify the page.
The configuration tool pane for User Directory is displayed below. You have two choices whether to read user profiles from SharePoint Portal Server or from Active Directory Services.
NOTE: If you are installing this Web Part on a Windows SharePoint Services (WSS), you must select Active Directory.
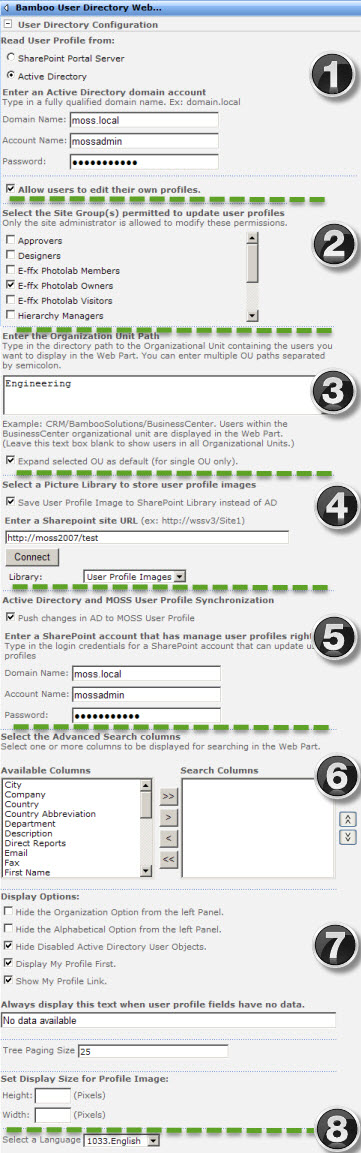 Each section of the tool pane is organized into sections below to make it simpler to find what you need to configure. Some options are required while others are optional:
-
Read User Profile From – Required: in this section of the tool pane, you make a choice as to which data source from which your web part will read user profiles. Domain name, account name and password must not empty or an error will occur.
-
Site Group(s) Permitted to Update User Profiles – This section only appears if you select to read from Active Directory Services.
-
Organizational Unit Path – This section of the tool pane appears when you select to read user profiles from Active Directory Services; enter the directory path to the Organizational Unit containing the users you want to display in the Web Part. You can enter multiple OU paths separated by semicolon.
-
Picture Library for User Profile Images – If you select to read ADS user profiles, you can store images of users in a picture library rather than in AD by including the URL here.
-
User Profile Synchronization – By reading ADS user profile data, you can push changes in AD to MOSS User Profile to keep everything in synch, but keep in mind this needs to be an account in SharePoint that can update user profiles.
-
Advanced Search Columns – Whether you select data from ADS or from SharePoint Portal Server, you use this option to display one or more columns when searching in the web part.
-
Display Options – These options are available regardless of your data source for user profiles; users will or will not see these items on the web part interfaced depending on your configuration choices here.
-
Language Section – Follow the standard protocol for selecting a language for a Bamboo web part.

There are fewer configuration choices when SharePoint Server is selected.
User Directory Complementary Products
 You will find many of our products complement each other quite nicely saving you the time and trouble to write custom code. With Bamboo at the heart of your SharePoint investment, you gain access to a huge catalog of enhancements, components, and accessories that add the critical functionality your business requires.
The same components can be easily used in future applications and they all come from a single, trusted vendor, ensuring an easy purchase process and support you can count on. That’s the Bamboo Way!
User Manager for Sites

Bamboo’s User Manager for Sites is a single web part that allows SharePoint Administrators to delegate user administration to Site Administrators. Designated Site Administrators can create, modify and delete users, create and delete groups, remove users from multiple groups at one time, e-mail a user or a group, and reset user passwords.
Install
|
Permissions
|
License
|
Permissions
|
|
|
|
|
|
Configure
|
Permissions
|
Work With
|
Permissions
|
|
|
|
|
|
Click here if you would rather see a complete list
of all topics for this product. |
Click on the shopping bag or here to download a trial of the product or to purchase it. |
|
Read User Profile From…
SharePoint Portal Server configuration
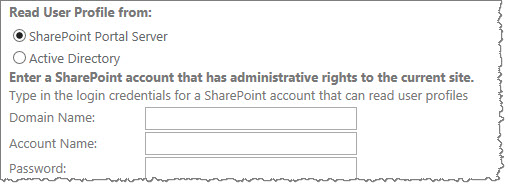 If you are using the SharePoint Portal Server option, you must enter a SharePoint account that must have the “Manage User Profile” permission in order to be able to read and update user profile information. You must also select whether you want to use the search available from User Directory to search user profiles or the MOSS people search, if it is configured.
Active Directory Services configuration
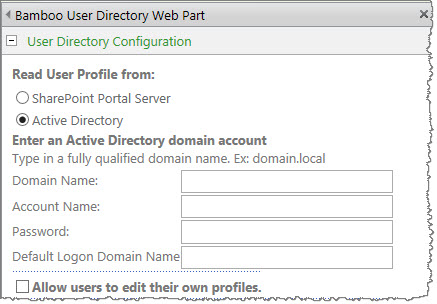 If you are using Active Directory Services (ADS), you must enter a domain administrator account that has Read and Write permissions to the ADS database.
NOTE: The domain administrator account is required to connect to Active Directory.
Allow Users To Edit Profile
If you select to read user profiles from Active Directory Services, then you have the option of allowing users to edit their own profiles. If this check box is enabled, a user can edit their profile without the required administrative account rights.
Understand Who Can Modify a User Profile for Active Directory Profiles: All users can view other user profiles.
Only domain users who have Read and Write permissions can edit another user’s profile. The Domain Administrator group has this right by default.
User & Group Management Widgets
This is a high level overview of the types of User and Group Management Widgets available. Click on the name of the widget to get details and examples.
Return to About Workflow Conductor Widgets
See also an Alphabetical List of Workflow Conductor Widgets.
Use the provided .lic file to extend your product’s trial period
Your Bamboo Account Manager may send you a *.lic file to use to extend your Bamboo product trial. The *.lic file needs to be placed in the folder on each WFE server where the product activation DLL resides. For SharePoint 2010 or SharePoint 2013, this is typically the Global Assembly Cache (GAC).
If you receive one, follow these instructions to install it.
| Step |
Action |
| 1. |
It is not possible to copy the *.lic file directly to the GAC. Instead, you will copy it to the gac_msil folder. On the SharePoint WFE server, from the Run command, enter
%systemroot%assemblygac_msil
Verify that you see the activation DLL for your Bamboo product listed. See Listing of Bamboo Solutions Web Parts and their associated Activation DLLs for details.
|
| 2. |
Copy and paste or drag and drop the .lic file into the gac_msil folder. |
| 3. |
Repeat steps 1-2 for each WFE server in the farm. |
| 4. |
If a trial expired error was surfacing, browse to the site and refresh the page. The error should disappear once the .lic file is copied successfully to each WFE server.
If you weren’t getting a trial expired error, you can verify the license was successfully extended by checking the status of your trial. See How to check the status of your trial license for more information.
 IMPORTANT: When you license this product after purchase, you will need to remove the *.lic file used to extend the trial as it may impact the license activation process. IMPORTANT: When you license this product after purchase, you will need to remove the *.lic file used to extend the trial as it may impact the license activation process.
|
| 5. |
If the expired license message doesn’t go away, it could mean that the assembly file for the product you are trialing is in the Global Assembly Cache (GAC) rather than the /bin. This more typical for SP2010/2013 than for SP2007. In this case, the *.lic file needs to be added to the GAC. |
User & Site Administration
Delegate and streamline the execution of common IT tasks on SharePoint with Bamboo’s full range of tools for password, user, and site management. Our Web Parts and toolkits make it easy to simplify and offload the execution of common tasks like password changes and site creation which provides faster results for end users and unburdens IT resources.
| Product Details |
Documentation |
Description |
 |
Administration Toolkit |
Bring advanced IT SharePoint administration functionality to your everyday sites and applications. This toolkit contains a full range of tools to help you with SharePoint password, user, and site management. |
 |
Group Redirect |
Protect sensitive data by redirecting cross-site group members from restricted site pages quickly and easily. |
 |
Navigators |
Bamboo Navigators let users create custom menus, tabs and Site Actions menus. Users can define the link URLs in one list and share the menu in different sites or across sites. |
 |
Password Change |
Allow users to change their password from within the SharePoint environment. |
 |
Password Expiration |
Notify users through email notifications and/or display notifications through a Web Part when account password is approaching expiration. |
 |
Password Management Toolkit |
Allow your users to manage their own password including: changing passwords, resetting passwords and receive proactive notifications when their password is about to expire. As an addition, provide the ability to create new user accounts with a defined set of users. |
 |
Password Reset |
Allow SharePoint users to reset their forgotten password without requiring IT Administrator’s intervention. |
 |
Site Creation Plus |
Site Creation Plus allows SharePoint system administrators to maintain a certain level of control over the naming conventions and site templates used. It also can add the new site to a Links list automatically, simplifying this second step of site creation that many users forget. |
 |
User Account Setup |
Allow select users the ability to create new user accounts through SharePoint saving IT Administrators time and effort. |
 |
User Directory |
Our User Directory web part integrates with SharePoint’s user profile database or Active Directory to allow you to display and update the user directory of your organization. |
|
User Manager for Sites |
User Manager for Sites provides administrators or specific users with access to a simple, SharePoint-based application that lets them maintain and organize user access security information for Sites in a Site Collection. |
|
User Profile Plus |
Easily manage user profile information kept in the WSS User Information List or a SharePoint Contacts List. |
|
User Profile Sync |
Bamboo’s User Profile Sync lets you automatically synchronize user information between the SharePoint User Profile database, Active Directory, Contact Lists and WSS 3.0 User Information Lists. |
|
User Redirect |
Protect sensitive data by redirecting specific users from restricted site pages quickly and easily. |
|
User Registration Accelerator |
Save time registering, approving and creating SharePoint accounts by letting users self-register. Users can register for SharePoint access and, once validated, can have both their domain and SharePoint accounts created automatically. |
|
Click here for a list view of the help topics.
Our User Directory provides an easy to use, SharePoint-based, self-service directory that allows users to maintain user information in the SharePoint User Profile Database or Active Directory. View your user organization in a user-friendly tree view by organization chart or in alphabetical order by last name. Users can view all profiles but can only edit their own profile depending on permissions set up for the type of directory service selected. With the ability to view, search and print user profile information (such as resume or skill set), your directory services now provide value to your users as well as your entire company.
Install
|
Permissions
|
License
|
Permissions
|
|
|
|
|
|
Configure
|
Permissions
|
Work With
|
Permissions
|
|
|
|
|
|
Click here if you would rather see a complete list
of all topics for this product. |
Click on the shopping bag or here to download a trial of the product or to purchase it. |
The User Account Setup web part allows select users the ability to create new user accounts through SharePoint saving IT Administrators time and effort.
Install
|
Permissions
|
License
|
Permissions
|
|
|
|
|
|
Configure
|
Permissions
|
Work With
|
Permissions
|
|
|
|
|
|
Click here if you would rather see a complete list
of all topics for this product. |
Click on the shopping bag or here to download a trial of the product or to purchase it. |
See filtered SharePoint list data in Mini Calendar
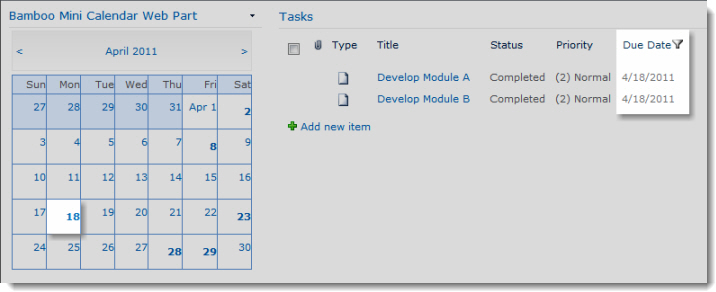 Mini-Calendar in this example has been configured to display items for a Tasks list web part and is also configured to filter a SharePoint List web part displaying the same list.
When a user clicks a bolded date in Mini-Calendar, it filters the Tasks list to display only items due on that date. For a step-by-step guide to configuring this example, see Provide a Date Filter to Another SharePoint web part.
Use the Bamboo.FixUpgrade utility to resolve broken links
Background
Because Alert Plus uses a combination of Web properties, event receivers and SharePoint lists to store URLs, the SharePoint Administrator must run this special command-line utility to update the static URLs associated with Alert Plus alert jobs that existed on the old farm. Until the utility is run, no existing alerts will work on the new farm.
Specifically, the Bamboo.FixUpgrade utility updates:
- Web Properties (Alert registration information)
- URLs in the Alert+ Configuration List
- URLs stored in Event Receivers on Alert lists
NOTE: The Bamboo.FixUpgrade utility is needed when you migrate your SharePoint farm using the Database Attach Upgrade Method (and the URL of the new farm is different than the URL of the old one), regardless of whether you are migrating to a new version of SharePoint or not.
Steps
To run the utility, follow these steps:
| Step |
Action |
| 1. |
On the SharePoint server in the new SharePoint Farm where Alert Plus was installed, locate the Bamboo.FixUpgrade.exe file. It is located in the Alert Plus product extraction folder in the /misc folder.
NOTE: This utility is run at the command prompt; it doesn’t have a user interface, so don’t bother double-clicking the .exe.
|
| 2. |
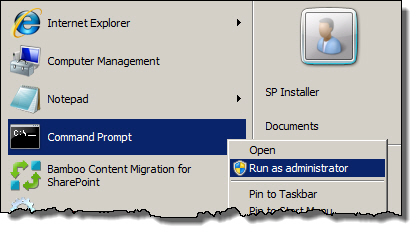 From the Start button on the server, select the Command Prompt and choose Run as administrator. From the Start button on the server, select the Command Prompt and choose Run as administrator. |
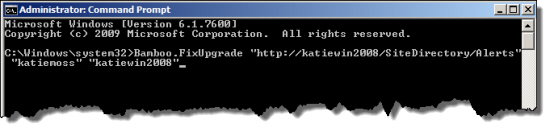
| 3. |
Change the directory in the Command Prompt to the directory that contains the Bamboo.FixUpgrade.exe file. Enter the following command:
Bamboo.FixUpgrade "[CurrentAlertPlusSiteURL]" "[OldDomainName]" "[NewDomainName]"
where:
- [CurrentAlertPlusSiteURL] is the site URL where Alert Plus resides in your new SharePoint Farm.
- [OldDomainName] is the domain name part of the URL you need to change.
- [NewDomainName] is the domain name part of the URL where your new SharePoint site resides.
See the example below:
|
| 4. |
Make sure that the alerts are updated successfully by completing the following verification:
- Navigate to the site on the new farm that you processed in Step 3.
- Select View all Site Contents > Alert+ Configuration List
- Verify that the values for the Alert List Site Path and Recipient List Site Path columns have the URL of the new farm.


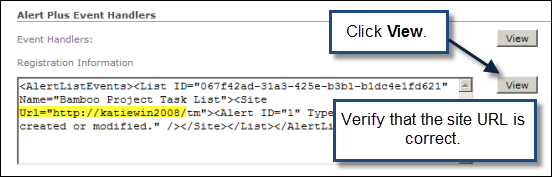
- Navigate to the Alert Plus Web Part on the site and click Support from the top menu.
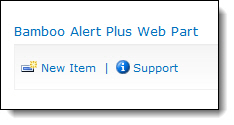
- Under Alert Plus Event Handlers in the Registration Information section, click View. Make sure the information listed includes the URL of the new farm.
|
| 5. |
Repeat Steps 3 and 4 for each instance of Alert Plus that was migrated to the new farm.
NOTE: Only repeat for Alert Plus instances that existed BEFORE the migration. There is no need to process alerts that are newly created on the new farm.
|
Use the Alert Plus Utility to update Event Receiver information
Use the Update Event Receivers tab of the Alert Plus Utilities only when prompted to do so by Bamboo Support.
The Update Event Receivers tab allows event receiver configuration to be manually updated. Event receivers should never be modified with this tool unless prompted by Bamboo Support.
Return to Overview of the Alert Plus Utilities
Use the Alert Plus Utility to see information about registered Event Receivers
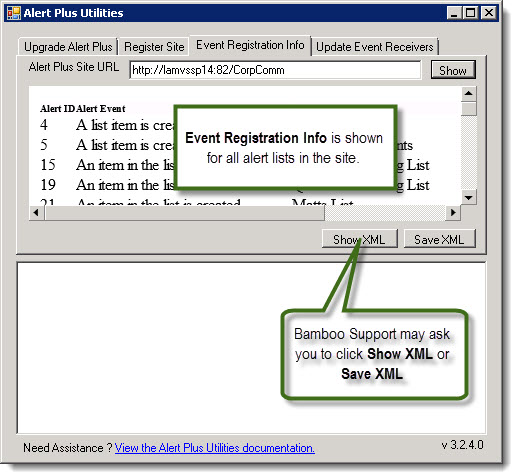 The Event Registration Info tab of the Alert Plus Utilities displays event receiver information. There are two types of alerts that use Event Receivers on the SharePoint List or Library. They are:
- An item in the list is deleted
- A specific column in the list changes.
The Event Registration Info utility lists all event receivers registered for any list or library on a given site. Bamboo Support can use this diagnostic information when troubleshooting problems with alerts.
Bamboo Support may request that you use the Show XML and Save XML buttons; these should be used only when prompted by Bamboo Support.
Return to Overview of the Alert Plus Utilities
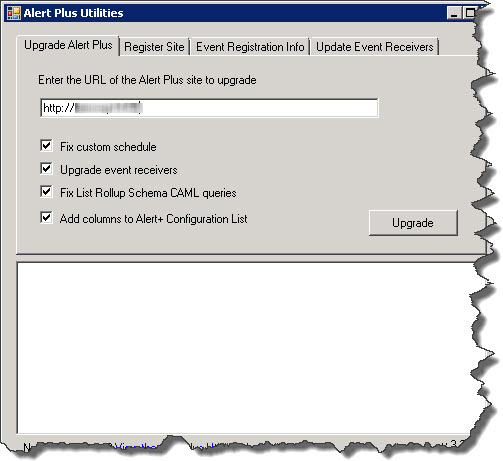
Use the Alert Plus Utility to Upgrade Sites
Use the Upgrade Alert Plus tab of the Alert Plus Utilities when upgrading Alert Plus Release 3.1 or later to the latest version.
As new features are added to Alert Plus, the Alert Plus Utilities is used to update your existing alerts to leverage the new features. As an example, for Release 3.1 the utility included configuration updates to custom alert schedules, event receiver architecture, List Rollup Schema CAML query structure, and new columns in the Alert+ Configuration List. These updates are not performed automatically when the Alert Plus Web Part is upgraded via the Installation/Setup. They must be made by running the Alert Plus Utilities for each individual site after the Installation/Setup upgrade is completed.
NOTE: If you moved or migrated SharePoint to a new farm with a different URL as part of your upgrade, you should ensure that all the sites using the Alert Plus web part are properly registered before running the utility to upgrade the sites. The utility depends on the registration information. See Use the Alert Plus Utilities to Register Sites for more information.
Follow these steps to use the Alert Plus Utility to upgrade a site:
| Step |
Action |
| 1. |
 From the Alert Plus product installation, start the install by clicking Setup.bat and highlight the Alert Plus Utilities. Verify the location and required permissions for the application and then click the Install button to launch it. From the Alert Plus product installation, start the install by clicking Setup.bat and highlight the Alert Plus Utilities. Verify the location and required permissions for the application and then click the Install button to launch it.
NOTE: Although the button says Install, there is nothing to install. The Install button launches the application directly from the Bamboo.AlertPlusUtilities folder of the Install package. An alternative way to start the application is to go to that folder and double-click the EXE file.
|
| 2. |
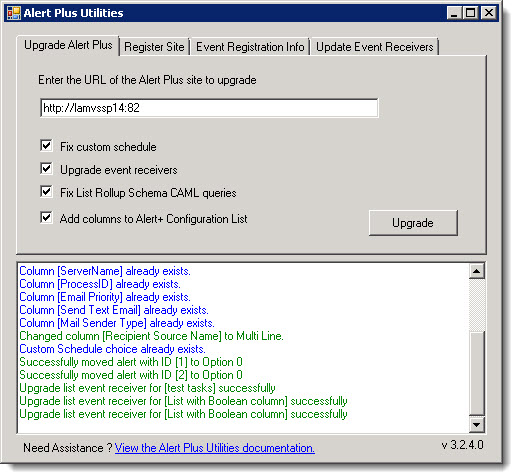
In the Upgrade Alert Plus tab, verify that all four upgrade options are checked. Enter the URL of a site containing the Alert+ Configuration List and click the Upgrade button.
|
| 3. |
Review the results of the upgrade activities in the status box. For any errors or warnings, read the information provided for important troubleshooting steps.
|
| 4. |
Repeat steps 2 and 3 for each site that contains an Alert+ Configuration List.
NOTE: The Alert Plus Utilities option to fix custom schedules may not work for certain custom schedules. Alert IDs with schedules that could not be updated are listed in the status box after the Upgrade is completed. To fix those schedules manually, modify the specified alert in the Alert Plus Web Part and update the Custom Schedule setting in the Event tab. For more information about available Custom Schedule updates, see Setting a Custom Schedule for an alert.
If Alert Plus is installed on several sites, you should consider using one of the available automation methods to upgrade all sites in a site collection or web app at once. If you are using
|
Return to Overview of the Alert Plus Utilities
Use the Alert Plus Utility to Unregister Sites
NOTE: Use Alert Plus Utilities to unregister a site if you are using Release 3.1 or later on any SharePoint version.
Background
Registering sites tells the Alert Plus timer job what sites may have alerts to process. If your site is not registered, no alerts will be processed. There are a few ways to register your site:
- Visit the page where the Alert Plus web part resides.
- Use the Alert Plus Utilities to register a site.
You may have an Alert Plus web part that you no longer use on a site. If you remove the Alert Plus Web Part from the site, you should unregister the site. Unfortunately, removing the web part does not automatically unregister the site. Removing the lists associated with the web part (Alert+ Configuration List and Alert+ AlertChangeList) will not unregister the site either. You need to use the Alert Plus Utilities to unregister a site.
NOTE: If you remove the Alert Plus web part from a site, the two lists (Alert+ Configuration List and Alert+ AlertChangeList) will remain. If the site is registered, enabled alerts will be processed.
Leaving a site registered, if there are no alerts to process, does not cause problems. However, it does generate log messages that you may not want cluttering your SharePoint logs.
Steps
Follow the instructions below to unregister a site using the Alert Plus Utilities:
| Step |
Action |
| 1. |
From the Alert Plus product installation, start the install by clicking Setup.bat and highlight the Alert Plus Utilities. Verify the location and required permissions for the application and then click the Install button to launch it.
NOTE: Although the button says Install, there is nothing to install. The Install button launches the application directly from the Bamboo.AlertPlusUtilities folder of the Install package. An alternative way to start the application is to go to that folder and double-click the EXE file.
|
| 2. |
 In the Register Site tab, select the Site URL radio button and enter the URL for the site to unregister. In the Register Site tab, select the Site URL radio button and enter the URL for the site to unregister.
NOTE: The URL entered for the Site URL must be valid. If you have migrated your SharePoint farm to new servers with a new URL, you will not be able to unregister the sites with the old URLs because the old URLs are no longer valid. You will need to use the Bamboo.FixUpgrade.exe utility to unregister those sites. The Bamboo.FixUpgrade.exe utility can also be used to register the sites with the new URLs. See Use the Bamboo.FixUpgrade utility to resolve broken links for more information.
|
| 3. |
Click the Unregister Site button. |
| 4. |
 Review the results of the unregistration activity in the status box. For any errors or warnings, read the information provided for important troubleshooting steps. Review the results of the unregistration activity in the status box. For any errors or warnings, read the information provided for important troubleshooting steps. |
Return to Overview of the Alert Plus Utilities
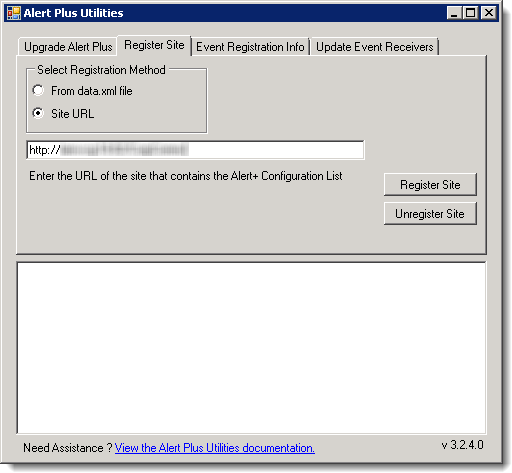
Use the Alert Plus Utility to Register Sites
NOTE: Use the Register Site tab of the Alert Plus Utility when upgrading from Alert Plus Release 2.8 or earlier. It is not needed if you are upgrading from a later release.
Background
Alert Plus Release 3.0 replaced the Web Service architecture of previous Alert Plus releases with SharePoint timer jobs. Alert Plus Release 2.8 and earlier registered sites to the Alert Plus Web Service using a file called data.xml. This file was located on the server where the Bamboo.AlertPlusService was installed (often an application server instead of a SharePoint Web front-end server). In order to “register” a site with the Alert Plus service, you needed to visit the page where the Alert Plus Web Part resided, which typically happened when you created your first alert. The data.xml file contained information about each site where an Alert Plus Web Part was used.
Alert Plus Release 3.0 and higher registers sites using site collection properties, so the data.xml is no longer required. Site registration is still updated by visiting the web part page where the Alert Plus Web Part resides, and is a step in the Upgrading Alert Plus from Release 2.x to 3.1 process. No alerts will be sent until the site where alerts reside is registered.
If you have several sites using Alert Plus, visiting every one to register the web part may take some time. The Alert Plus Utility can update site registrations for Alert Plus from a central place, eliminating the need to visit multiple sites. There are two different methods the utility uses. If you are upgrading from release 2.x, it can reference the old data.xml file to know where Alert Plusresides. Otherwise, you can enter the specific site URL you want to register.
Steps
Follow the instructions below to update site registration using the Alert Plus Utility:
| Step |
Action |
| 1. |
From the Alert Plus product installation, start the install by clicking Setup.bat and highlight the Alert Plus Utilities. Verify the location and required permissions for the application and then click the Install button to launch it.
NOTE: Although the button says Install, there is nothing to install. The Install button launches the application directly from the Bamboo.AlertPlusUtilities folder of the Install package. An alternative way to start the application is to go to that folder and double-click the EXE file.
|
| 2. |
In the Register Site tab, choose whether to register:
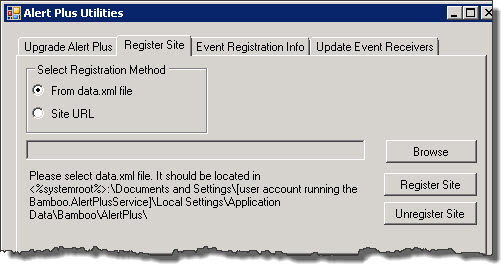
All Alert Plus sites at once using the Alert Plus Release 2.x data.xml file. If you choose this method, browse to the location of the data.xml file.
NOTE: You might consider copying the data.xml file to the server where you are running the Alert Plus Utilities.
OR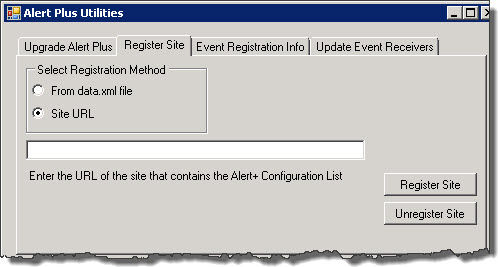
A single site. If you choose this method, enter the URL of the site to register.
NOTE: If you have the data.xml file available, it is much faster to register sites using it. The data.xml file is on the server where the Bamboo.AlertPlusService for Alert Plus Release 2.x was running. Bamboo recommends copying this file to the server location where the Alert Plus Utility is running.
|
| 3. |
After selecting a registration method and entering required information for that method, click the Register Site button.
NOTE: The Register Site tab of the Alert Plus Utility also allows you to unregister sites. You may want to unregister a site if an Alert Plus Web Part is removed from a site. See Use the Alert Plus Utility to Unregister Sites for more information.
|
| 4. |
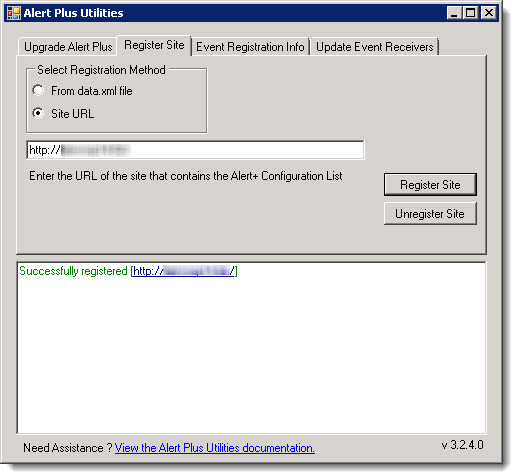 Review the results of the registration activities in the status box. For any errors or warnings, read the information provided for important troubleshooting steps. Review the results of the registration activities in the status box. For any errors or warnings, read the information provided for important troubleshooting steps. |
| 5. |
Repeat steps 2-4 for other sites that need to be registered. |
Return to Overview of the Alert Plus Utilities
Use the ‘An Item Exists’ Trigger Type
The following outlines how to quickly configure a reminder alert. This alert uses the trigger type An item exists and a Bamboo List Rollup Schema as the Data Source.
Go to the page in your Portal, where the Alert Plus Web Part exists. If it hasn’t been added to a page yet, see How to add a web part to a SharePoint wiki page.
 It is not necessary to add an Alert Plus Web Part to a page in each site. Because you specify the URL for the site where the alert items reside, you can consolidate your alerts in one web part on a single page in your site collection.
| Step |
Action |
| 1. |
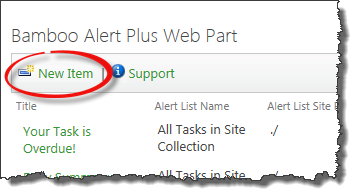 From the Alert Plus toolbar, click New Item. From the Alert Plus toolbar, click New Item. |
| 2. |
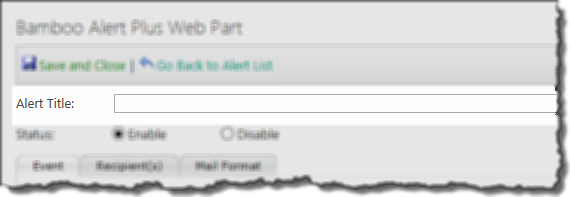 Give the new alert a title. You won’t be able to save the alert without a title. Give the new alert a title. You won’t be able to save the alert without a title. |
| 3. |
Identify the site where the items that will trigger an alert reside. First choose whether they are in a SharePoint List or Library or a Bamboo List Rollup. For this example, we will choose Bamboo List Rollup Schema *
Next, enter the URL for the site where the List Rollup Schema was defined. After entering the URL, click the Load button to load the available schemas into the What List contains the items to alert on? box. For this example, we will choose the schema called All Tasks in Site Collection.
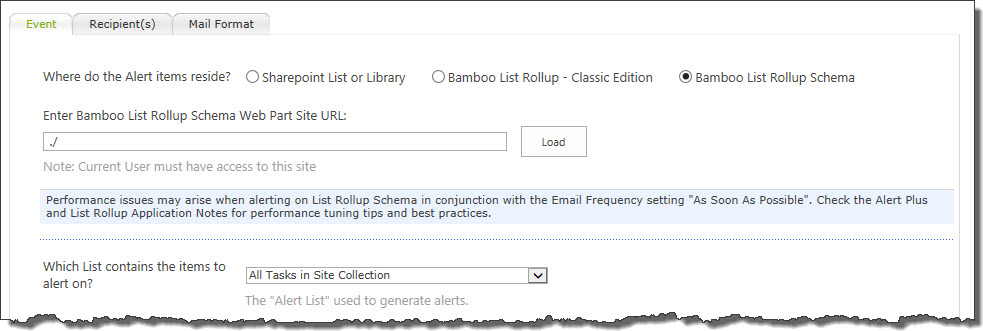
When possible, use relative URLs. For example, if the List Rollup Schema was defined on the current site, enter ./ in the Enter Bamboo List Rollup Schema Web Part Site URL box.
|
| 4. |
Choose a What triggers the alert? option. For an alert that is sent as a reminder what a Task is overdue, we choose An item exists.

For the Follow-up Wait Days, enter the number of days to wait before sending another email about the same overdue item. In other words, this type of alert has an automatic escalation. Reminder emails will continue to be sent as long as the item continues to meet the alert criteria. |
| 5. |
Choose How often are e-mails sent? For this example, choose As Soon As Possible so the email recipient receives the message as soon as we realize the task is overdue. Since the As Soon As Possible emails are processed every two minutes, this means the reminder emails will be sent shortly after midnight.
Processing emails shortly after midnight is a good time to process reminder emails since it is typically not a busy time for your SharePoint server(s).
For information about the other options, including Combining multiple alerts into summary notification, see How often should E-mails be Sent.
|
| 6. |
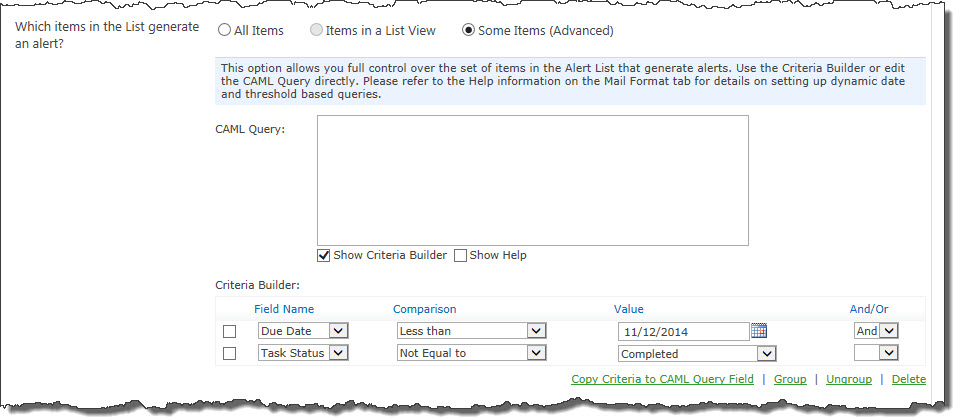
What column values should generate an alert? For this example, we will use the CAML Criteria Builder. Select the Some Items (Advanced) option and enter the criteria as shown in the screen below. The specific date chosen as the Value for Due Date is not important since we will be changing it to use the current date. Click Copy Criteria to CAML Query Field when ready. The CAML Query will appear in the CAML Query box.
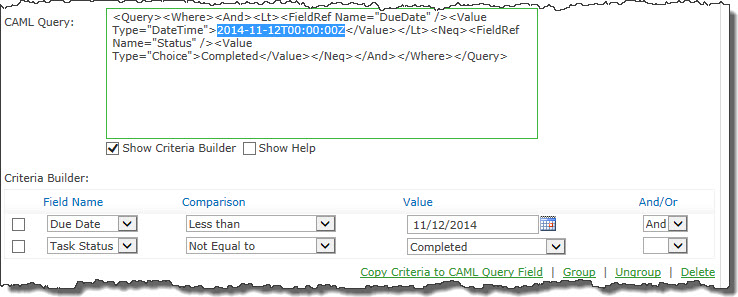 Highlight the date value entered, as shown here: Highlight the date value entered, as shown here:
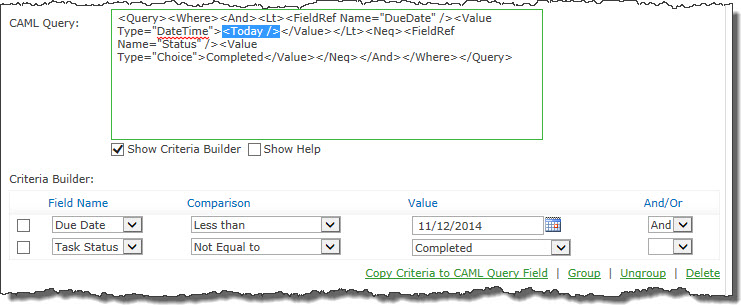 Enter <Today /> where the date value was, as shown here: Enter <Today /> where the date value was, as shown here:
This results in a query that will automatically find all overdue tasks. |
| 7. |
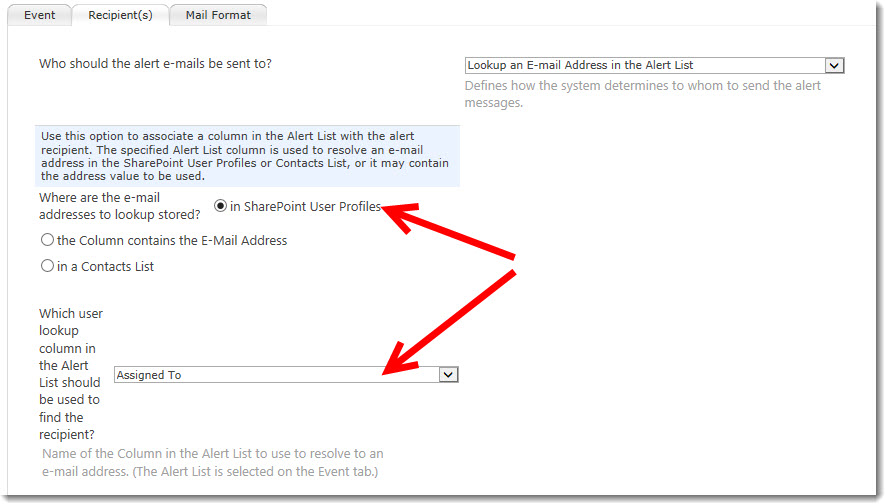
Click the Recipient(s) tab and choose the recipient of the email alert. For this example, we will send the reminder emails to the Task assignee by selecting the Lookup an E-mail Address in the Alert List option. The Assigned To column is in the Tasks list, but it includes the person’s name, not an email address. Select the in SharePoint User Profiles to tell Alert Plus where to find the email address associated with the person.
See Overview of Alert Plus Recipient Tab for more information.
|
| 8. |
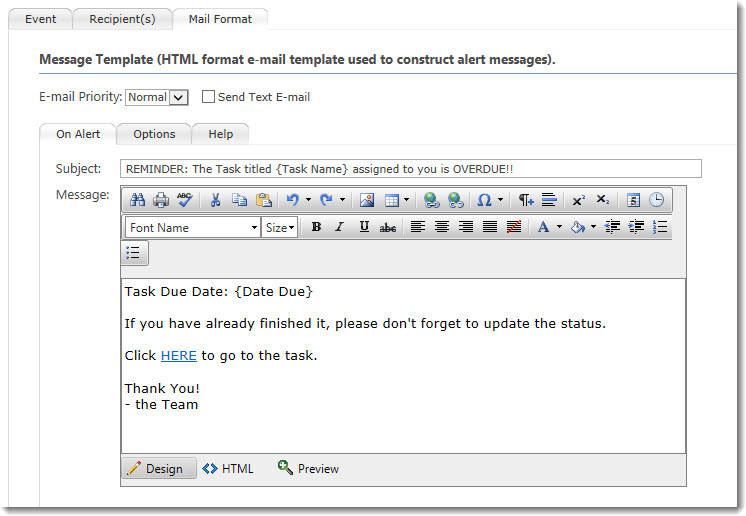
Click the Mail Format tab and compose your message. To include columns values from or a link to the alert item, use tokens. For our example, we will compose a message like this:
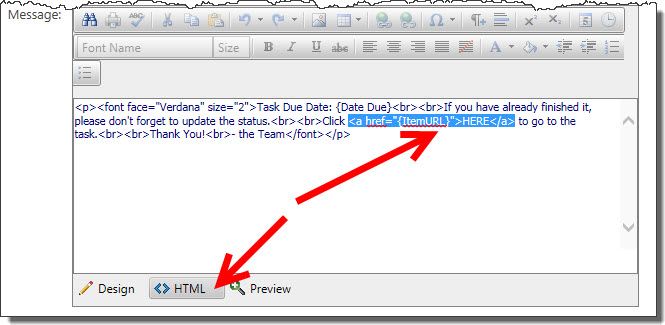
To see how the hyperlink to the task was composed, see the HTML view below:
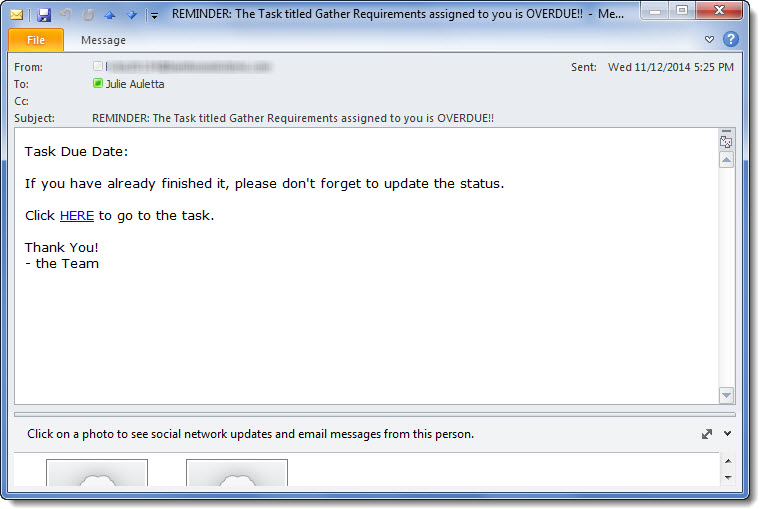
For more information about using tokens in mail formats, see Using Tokens in your Alert Plus Email Message. The email below is how this message will look. Notice that a blank due date in SharePoint will appear blank in the email message also.
 |
| 9. |
Click the Save and Close button on the toolbar to save the new alert. |
*Bamboo’s List Rollup web part is sold separately.
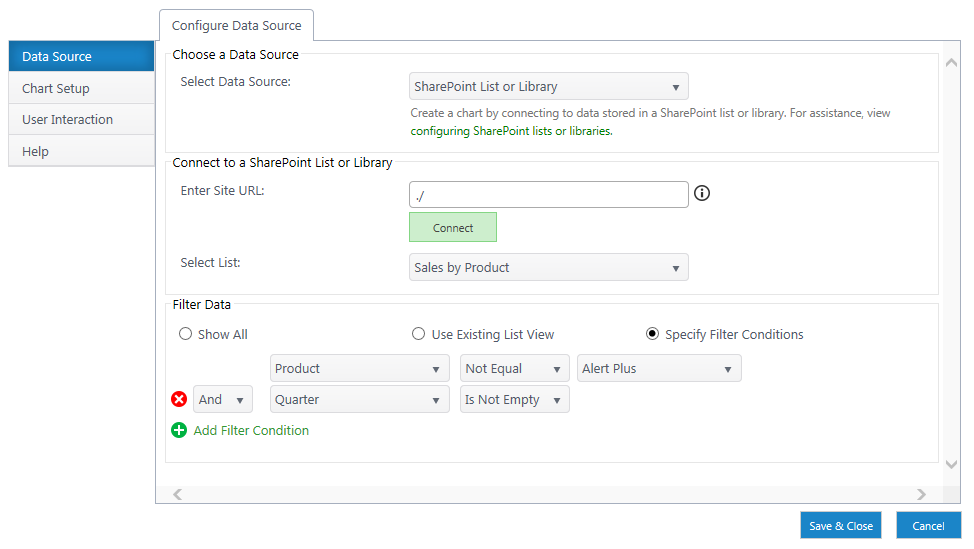
Use an External List as the Chart Plus Data Source
Back to Create a New Chart
Using an external list requires configuring the external content type, configuring the external list and then setting up the list like a typical SharePoint List in Chart Plus.
Refer to Microsoft article How to: Create an External Content Type Based on a SQL Server Table for instructions on how to create an External Content Type.
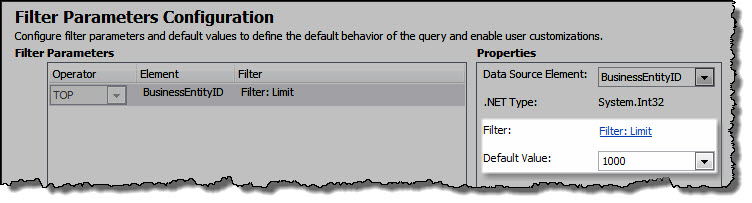
Note: In the Filter Parameters Configuration screen, enter a Filter Limit of 1000 in Default Value. If the Default Value is not set to 1000, the external system may fail to return any data.
After you have created an External Content Type, you can create an External List. Refer to Microsoft article How to: Create External Lists in SharePoint for instructions on how to create an External List.
To connect your list as a data source, open the Chart Plus Data Source menu and enter the external list as a SharePoint List or Library.
 The Lock Topic feature must be enabled in the Forum Settings before it is an available discussion board option. When Lock Topic is enabled, you must have at least the Manage Lists permission in SharePoint to use the feature.
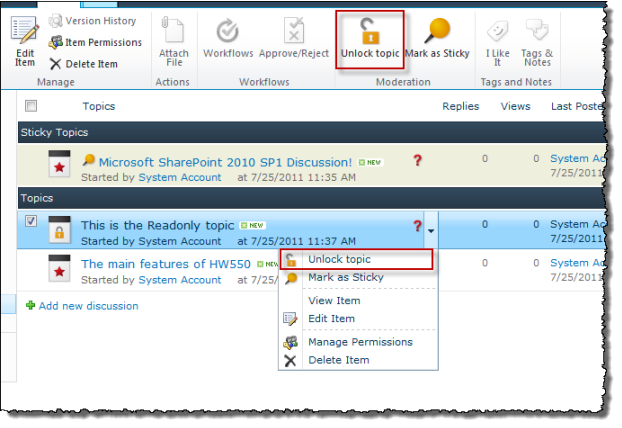
 or a reply
  .
.